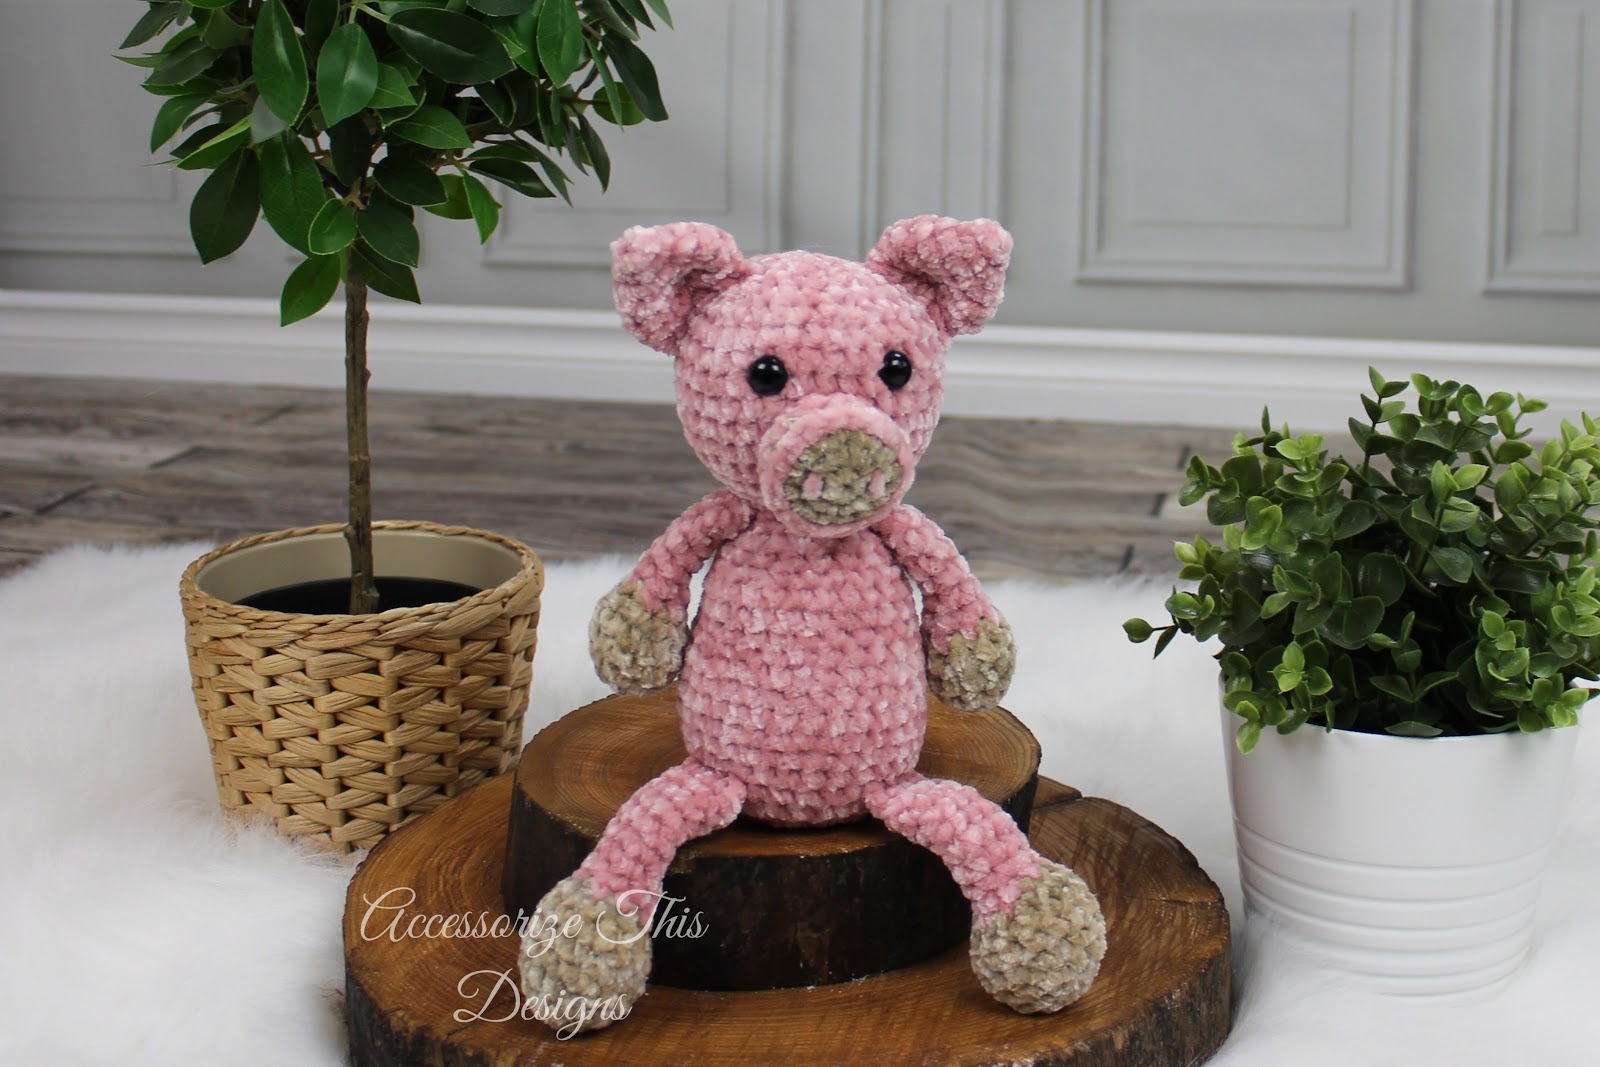
The Flip Flop Pig Crochet Pattern is number 2 in the Farm Flip Flop collection. This adorable little piggy is shown using super soft Bernat Velvet (5) and Bernat Crushed Velvet (5) yarn and 12mm black safety eyes (from the fabulous @Suncatchercrafteyes ). She could easily be made with your favourite worsted weight yarn and smaller hook (see my post about how to adjust). She’s worked from the bottom up, with a no sew limb option. This pattern includes video tutorials to assist you as you work through the pattern. This pattern uses surface crochet to smooth out the transition between colours around the muzzle.
If you have any questions or concerns with this, or any other pattern written by Darling Maple Designs, please do not hesitate to contact me at: info@darlingmapledesigns.com.
Interested in more cute crochet patterns? Check these out!
What you will need for your Flip Flop Pig Crochet Pattern

Materials:
Hook size 5.5 mm (I)
Main Colour – Bernat Velvet (Quiet Pink) – 75 yards
Accent Colour –
Bernat Crushed Velvet (Cream) – 25 yards
- Polyester filling – small amount
- 2 – 12mm black safety eyes (not suitable for children under 3): see video for embroidering sleepy eyes as an alternative.
- Stitch Markers or Safety pins to help with sewing placement
- Yarn needle to weave in the ends
Gauge:
4 Rounds of Gauge Pattern = 2.0 inch diameter
Gauge Pattern:
Create a Magic Ring
Round 1: 6sc in the ring (6)
Round 2: 2sc in each st (12)
Round 3: *sc, 2sc* 6 times (18)
Round 4: *sc in the next 2 sts, 2sc* 6 times (24)
Abbreviations:
| ch | chain |
| sc | single crochet |
| scdec | single crochet decrease |
| ss | slip stitch |
| st(s) | stich(es) |
| *to* | repeat the sequence between the ** the number of times indicated |
Special Stitches & Techniques:
Magic ring – https://youtu.be/s3xHu-fmQ6k
No Sew Method Attaching Legs: https://youtu.be/W7x8-ylZiyU
No Sew Method Attaching Arms: https://youtu.be/-m_GTt5JVNE
Sleepy Eyes – https://youtu.be/4kO0XAkXMGo
Surface Crochet Muzzle – http://www.mooglyblog.com/surface-crochet-tutorial/
Notes:
- #sc, eg. (2sc, 3sc, etc) shows the number of scs to be completed in the indicated st
- Sts listed between brackets are all worked in the same st, eg. (hdc, dc)
- I highly recommend using a stitch marker to help keep track of the rounds for the body/head
- The pattern has both a ‘sew’ and no sew option for the limbs shown in the Body/Head section.
Recommended Sequence:
It is highly recommended to complete the Flip Flop patterns in the order they are written (especially if you are using the no-sew option for the limbs).
Start your Flip Flop Pig Crochet Pattern
Arms (make 2):
The arms are worked from the “hoof” to the body, in continuous rounds.
Using Accent Colour, create a Magic Ring
Round 1: 6sc in the ring (6)
Round 2: *2sc* 6 times (12)
Round 3-4: sc in each st (12)
Round 5: *sc in the next 2 sts, scdec* 3 times (9), change to Main Colour.
Round 6: *sc, scdec* 3 times (6)
Stuff only the ‘hoof’ portion of the arm, the rest will be left unstuffed.
Rounds 7-12: sc in each st (6)
Flatten and sc through both sides (3sts).
End off leaving a 12 inch tail if sewing.
Legs (make 2):
The legs are worked from the “hoof” to the body, in continuous rounds.
Using Accent Colour, create a Magic Ring
Round 1: 6sc in the ring (6)
Round 2: *2sc* 6 times (12)
Round 3: *sc in the next 3 sts, 2sc* 3 times (15)
Rounds 4-6: sc in each st (15)
Round 7: *sc in the next 3 sts, scdec* 3 times (12), change to Main Colour
Round 8: *sc in the next st, scdec* 4 times (8)
Stuff only the ‘hoof’ portion of the leg, the rest will be left unstuffed.
Rounds 9-16: sc in each st (8)
Flatten and sc through both sides (4 sts).
End off, leaving a 12 inch tail if sewing.
Body/Head:
The body and head are worked in one piece from the bottom up in continuous rounds.
Option 1: Sewing the Legs and Arms to the body
If you are sewing your legs and arms onto your body then ‘sc in each st’ for Round 6 and Round 21.
Option 2: Crochet Legs and Arms to the body
If you are crocheting your legs and arms onto your body please follow the pattern as written for the Body/Head.For assistance in crocheting the limbs on see Videos:
Attaching Legs: https://youtu.be/W7x8-ylZiyU
Attaching Arms:https://youtu.be/-m_GTt5JVNE
Using Main Colour, create a Magic Ring
Round 1: 6sc in the ring (6)
Round 2: *2sc* 6 times (12)
Round 3: *sc in the next st, 2sc* 6 times (18)
Round 4: *sc in the next 2 sts, 2sc* 6 times (24)
Round 5: *sc in the next 3 sts, 2sc* 6 times (30)
Round 6 Option 1: sc in each st (30)

Option 2: Hold your first leg in front of your work (body). Working through both pieces, sc in the next 4 sts, working through the body only, sc in the next 5 sts, Hold the second leg in front of your work (body). Working through both pieces, sc in the next 4 sts, working through the body only, sc in the last 17 sts (30).
Rounds 7-12: sc in each st (30)
Round 13: *sc in the next 3 sts, scdec* 6 times (24)
Rounds 14-16: sc in each st (24)
Note: You may want to begin stuffing
Round 17: *sc in the next 2 sts, scdec* 6 times (18)
Round 18-19: sc in each st (18)
Round 20: *sc in the next st, scdec* 6 times (12), end off, weave in end.
Round 21 Option 1: sc in each st (12)
Option 2: Place the animal down on a hard surface with the body face ‘up’ and the legs facing you. Locate the 3 centre front sts and mark them with a stitch marker (the arms will be placed on either side of these sts). Locate the far right marked st. Count over 3 sts to the right of it and attach your yarn to the body. (If left handed you will locate the left st and count over 3 sts to the left).
Place the first arm in front of the body to the right of the marked sts (left if you’re left handed). Working through both pieces (beginning with the first st of the arm and the stitch on the body you attached your yarn to), sc in the next 3 sts.
Working through the body only, sc in the next 3 sts (these are your marked sts). Place the second arm in front of your work (body). Working through both pieces, sc in the next 3 sts, working through the body only, sc in the last 3 sts (12).


Round 22: *sc in the next st, 2sc* 6 times (18)
Round 23: *sc in the next 2 sts, 2sc* 6 times (24)
Round 24: *sc in the next 3 sts, 2sc* 6 times (30)
Round 25: *sc in the next 4 sts, 2sc* 6 times (36)
Rounds 26-31: sc in each st (36)
Add safety eyes to Round 28 approximately 4-5 sts apart, continue stuffing.
Round 32: *sc in the next 4 sts, scdec* 6 times (30)
Round 33: *sc in the next 3 sts, scdec* 6 times (24)
Round 34: *sc in the next 2 sts, scdec* 6 times (18)
Finish stuffing
Round 35: *sc, scdec* 6 times (12)
Round 36: *scdec* 6 times (6)
End off leaving a 6 inch tail, cinch the last 6 sts together and weave in the end.
Snout:
Made in continuous rounds.
Using Accent Colour, create a Magic Ring
Round 1: 6sc in the ring (6)
Round 2: *2sc* 6 times (12)
Round 3: *sc, 2sc* 6 times (18), change to Main Colour leaving Accent Colour attached for surface crochet.
Round 4: *sc in the next 4 sts, scdec* 3 times (15)
Round 5: sc in each st (15)
End off leaving 12 inch tail for sewing. Using Accent Colour, surface crochet through the base of each st of Round 4. See video: http://www.mooglyblog.com/surface-crochet-tutorial/
Ears: (make 2)
Made in continuous rounds beginning at the tip of the ear.
Using Main Colour, create a Magic Ring
Round 1: 4sc in the ring (4)
Round 2: *sc, 2sc* twice (6)
Round 3: *2sc* 6 times (12)
Round 4: *sc in the next 3 sts, 2sc* 3 times (15)
Round 5: sc in each st (15)
Round 6: *sc in the next st, scdec* 5 times (10)
Do not stuff, ss in the next st, flatten and sc through both sides (5sts). End off leaving 12 inch tail for sewing to the head.
Tail:
Made in 1 row.
Using Main Colour, ch 9
Row 1: 3sc in the 2nd ch from the hook, 3sc in the next 7 chs (24)
End off leaving a 6 inch tail for sewing.
How to assemble your Flip Flop Pig Crochet Pattern
Sewing Placement – I highly recommend pinning ALL parts in place BEFORE sewing to make sure everything sits properly and is to your liking 🙂
| Note: Disregard sewing the legs and arms if you’ve already crocheted them on. Legs: Place the legs at approx Round 5 of the body about 4 sts apart.Sew in place. When sewing the legs in place I sewed the top of the last FULL ROUND DOWN instead of just the sts from crocheting the round together. |
| Arms: Place the arms at approx Round 21 of the body, approx 3 sts apart. Sew in place. When sewing the arm in place I sewed the top of the last FULL ROUND DOWN instead of just the sts from crocheting the round together. |
| Snout: Centre the snout on the body placing it between Rounds 22 and 27 on the head. Stuff lightly and sew down along Round 5 of the snout. |
| Nostrils: Embroider 2 small vertical lines onto the front of the muzzle. |
| Ears: Place the ears running vertically between Round 30 and 33 (approx 2 rounds/sts towards the face). Sew in place. |
| Tail: Centred on the back of the body. Place vertically between Rounds 6 and 9 of the body. Sew in place. |
Congratulations!
You have now completed your Flip Flop Pig Crochet Pattern.
We love seeing your finished projects. Tag us in your photos and posts using #DarlingMapleDesigns or @darlingmapledesigns.
Thank you so much for joining us! I hope you loved completing your Flip Flop Pig Crochet Pattern as much as I enjoyed designing it. Don’t want to miss a stitch? Subscribe to the Darling Maple Designs newsletter and I’ll send updates for new pattern releases, sales and promotions straight to your inbox. See you again soon! Sara <3
If you have any questions or concerns with this, or any other pattern written by Darling Maple Designs, please do not hesitate to contact me at: info@darlingmapledesigns.com.
Don’t forget to Pin it to your project board.